
Table of Contents
Losing data from your Android device can be a distressing experience, whether it’s precious photos, important messages, or critical documents. Fortunately, there are several methods and tools available that can help you recover your lost data. This article explores 10 proven techniques for effective Android data recovery, each with its own set of features and steps. From using specialized recovery software like DiskDigger and Tenorshare UltData to leveraging cloud services like Google Drive and Dropbox, we’ll guide you through the process of getting your data back.
Key Takeaways
- DiskDigger Photo Recovery offers a straightforward solution for retrieving lost photos on Android devices.
- Tenorshare UltData stands out with its rapid search and recovery capabilities, even for users without rooted devices.
- Cloud services such as Google Drive and Dropbox can be lifesavers for undeleting files, provided you’ve previously set up synchronization.
- Recovering WhatsApp data is possible and crucial for many users, highlighting the importance of regular backups.
- When all else fails, professional Android data recovery services offer a last resort for retrieving seemingly lost data.
1. DiskDigger Photo Recovery

DiskDigger Photo Recovery is a renowned tool for retrieving lost or deleted photos on Android devices. After mere seconds, you’ll have your files back, making it a go-to solution for quick photo recovery. The free version of DiskDigger is capable of restoring photos and videos, which suffices for most casual users.
However, for those needing to recover additional file types or utilize an FTP server for recovery, upgrading to the full version is necessary. It’s important to note that root access is required for more comprehensive recovery results.
DiskDigger stands out for its simplicity and effectiveness in recovering multimedia files, ensuring that your precious memories are not lost.
Here are the steps to use DiskDigger for photo recovery:
- Download DiskDigger from the Google Play Store.
- Launch the app and select either ‘Basic Scan’ or ‘Deep Scan’.
- Choose the file types you want to recover.
- Mark the files for recovery and tap ‘Recover’.
2. Tenorshare UltData

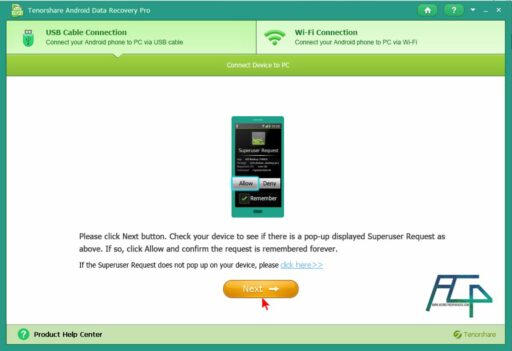
Tenorshare UltData has quickly become a strong contender in the data recovery arena, offering a fast and efficient solution for Android users. The application’s rapid search and recovery capabilities make it a go-to option for those looking to retrieve lost data without the need for rooting their devices.
UltData stands out for its speed during scans and almost instantaneous recovery process, rivaling the performance of well-known tools like DiskDigger.
However, users should be aware of its limitations, such as a somewhat convoluted interface and a restricted trial version. For those seeking to recover deleted photos and WhatsApp data such as pictures, videos, chats, and documents, UltData is a suitable choice, especially when direct smartphone-to-PC connections are preferred over using a micro SD card adapter.
Here are some pros and cons to consider:
-
Pros:
- Rapid search and recovery
- Standalone app
- No root required
-
Cons:
- Convoluted interface
- Limited trial
3. Undelete Lost Google Drive Files

Losing important files on Google Drive can be a stressful experience, but Android users have a straightforward way to recover them. Google Drive retains deleted files in the Trash for 30 days, giving you a window to restore your data before it’s permanently erased.
To begin the recovery process, open the Google Drive app and navigate to the Trash folder. Here’s a simple guide to help you undelete your files:
- Step 1: Open the Google Drive app on your Android device.
- Step 2: Access the Trash by tapping on the three horizontal lines and selecting it from the menu.
- Step 3: Long-press the first file you wish to recover, then select any additional files.
- Step 4: Tap the three dots icon and choose ‘Restore’ to recover the files to their original location.
Remember, acting quickly is crucial as the 30-day period is your only window to recover files without resorting to more complex data recovery methods.
4. Restore Files in Dropbox

Restoring files in Dropbox is a straightforward process that can be a lifesaver when you’ve accidentally deleted important data. First, log in to the Dropbox website with your credentials; the mobile app won’t show the deleted files. Once logged in, navigate to the ‘Deleted files’ section from the slide menu.
To recover your files, follow these steps:
- Open your preferred browser and go to the Dropbox site.
- Sign in using the same credentials as the app.
- Access the menu and select ‘Deleted files’.
- Choose the files you wish to restore.
- Use the ‘Restore’ button to undelete your selections.
Remember, if you can’t find the files you’re looking for, they might have been permanently deleted or are beyond the recovery window. In such cases, consider checking our extended guide on recovering deleted files from Google Drive.
5. Recover WhatsApp Data

Recovering WhatsApp data on your Android device can be surprisingly straightforward. If WhatsApp locates a backup, it will prompt you to restore it. Simply tap on the ‘Restore’ button to initiate the recovery process. After the restoration, WhatsApp will inform you of the success of the operation, allowing you to return to the main interface with your data restored.
To ensure a smooth recovery process, follow these steps:
- Uninstall and reinstall WhatsApp.
- Grant the necessary permissions by tapping ‘Continue’ and ‘Allow’ on all prompts.
- Tap on ‘Restore’ when prompted to recover from a backup.
It’s essential to regularly back up your WhatsApp data to avoid losing important messages and media. This can be done through the app’s settings, ensuring that you have a recent backup to restore from in case of data loss.
Remember, the recovery is contingent on the presence of a backup. In the absence of a backup, third-party tools like iToolab RecoverGo may offer a solution for retrieving deleted WhatsApp messages.
6. Recover Lost Android Files with Mac and Disk Drill

When it comes to retrieving lost data on a Mac, Disk Drill stands out as a prime choice. This tool is tailored for macOS users and provides a streamlined process for Android data recovery. To get started, you’ll need to install Disk Drill from its official site and ensure it’s in your Applications folder.
Follow these simple steps to recover your files:
- Connect your Android device to your Mac using a USB cable.
- Enable USB debugging on your Android when prompted.
- Allow Disk Drill to access your device for maximum recovery potential.
Disk Drill’s effectiveness hinges on its ability to gain unrestricted access to your Android device, which is crucial for a thorough data recovery process. While Disk Drill is a top recommendation, it’s not the only option available. For a broader range of choices, consider exploring other Android data recovery software.
Remember, successful data recovery is often time-sensitive. Act quickly to improve the chances of restoring your lost files.
7. Get Back Disappeared Android Files on PC with PhoneRescue

PhoneRescue by iMobie stands out as a reliable solution for recovering lost Android files on a PC. It operates through a desktop app that pairs with a client on your Android device, enabling a comprehensive data recovery process.
To use PhoneRescue effectively, follow these simple steps:
- Connect your Android device to your PC.
- Launch the PhoneRescue desktop app.
- Allow the app to detect the Android client.
- Select the type of data you wish to recover.
PhoneRescue supports a wide array of data types, ensuring that your most valuable files can be retrieved.
However, it’s important to note that the trial version of PhoneRescue only allows for data preview. For actual recovery, purchasing the full version is necessary. Users should also be aware that root access may be required, and PhoneRescue is not a standalone Android app.
8. Undelete Data from SD Card with Disk Drill for Windows

Losing data on an SD card can be frustrating, but with Disk Drill for Windows, recovery is within reach. Disk Drill is a robust tool that can scan and recover lost or deleted files from your SD card. The process is straightforward:
- Download and install Disk Drill on your PC.
- Connect your SD card using a reliable adapter.
- Launch Disk Drill, select the SD card, and initiate a scan for lost data.
- After the scan, review the found items and select the files you wish to recover.
Remember to avoid using the SD card for new data if you plan to recover files. This prevents overwriting and increases the chances of a successful recovery.
Once you’ve selected the desired files, Disk Drill will handle the recovery, allowing you to save the files back to your Android device or keep them on your computer for safekeeping. It’s important to note that continuous use of the SD card after data loss can hinder recovery efforts.
9. Save Files Directly on Android with Disk Digger

Even without the aid of a computer, Disk Digger enables direct file recovery on Android devices. This convenience means you can restore your data anytime, anywhere. DiskDigger stands out for its user-friendly interface and the ability to save recovered files to various destinations.
To get started with DiskDigger, follow these simple steps:
- Install DiskDigger from Google Play onto your Android device.
- Launch the app and select ‘START BASIC PHOTO SCAN’ for non-rooted devices or ‘FULL SCAN’ for rooted devices for more comprehensive results.
- Grant the necessary permissions to DiskDigger when prompted.
- Allow the scan to proceed; the longer it runs, the more files it will potentially recover.
While DiskDigger is straightforward to use, it’s worth noting that root access is required for optimal performance. If you’re hesitant about rooting your device, the basic photo scan still offers a chance to retrieve your precious memories.
10. Expert Android Data Recovery Services

When self-help solutions fall short, Expert Android Data Recovery Services step in to rescue your precious data. Companies like DriveSavers offer specialized services to recover lost or damaged Android data with a high success rate. These services are particularly useful when dealing with complex data loss scenarios that are beyond the capabilities of DIY software.
With the right expertise, even seemingly unrecoverable data can often be salvaged from Android devices.
Choosing a professional service means entrusting your device to seasoned experts who understand the intricacies of Android data storage. They use advanced tools and techniques to ensure the secure and efficient retrieval of your data. Here’s a quick look at what you can expect:
- Initial consultation to assess the situation and potential for recovery
- Secure handling of your device to prevent further data loss
- Use of proprietary recovery methods to maximize success
- Return of recovered data on a new storage medium
Remember, while expert services come at a cost, the peace of mind and potential recovery of irreplaceable data often justify the investment.
Conclusion
In the journey to recover lost data from your Android device, we’ve explored a variety of methods, each with its own set of advantages and potential drawbacks. From utilizing specialized recovery apps like DiskDigger and UltData to leveraging the expertise of professional data recovery services, the options are plentiful. It’s important to remember that while some methods may require a rooted device or a computer, others can be performed directly on your Android phone. The key takeaway is to act promptly and choose the recovery solution that best fits your situation. Whether it’s accidental deletion or a malfunctioning SD card, these proven techniques offer a beacon of hope for retrieving your precious files. Remember to always back up your data to prevent future losses, and don’t hesitate to seek expert help if the task seems daunting. With the right approach, you can overcome the panic of data loss and restore your valuable information.
Frequently Asked Questions
I deleted some files on my Android smartphone – can I undo and recover them?
Yes, in many cases, deleted files on Android can be recovered using various data recovery software like DiskDigger, Tenorshare UltData, or professional recovery services.
My Android device is rooted – will that affect any chances of recovery negatively?
Rooting can actually improve the chances of recovery for some apps, as they can gain deeper access to the device’s storage. However, it’s important to use reliable software to avoid further data loss.
Can my computer assist in recovering more data from my Android device?
Yes, connecting your Android device to a computer and using data recovery software like Disk Drill can help you recover more data than standalone Android apps.
Is it possible to recover deleted files on Android if I don’t have access to a computer?
Yes, there are Android apps like DiskDigger that allow you to recover files directly on your device without the need for a computer.
What are the pros and cons of Tenorshare UltData for Android data recovery?
Pros of UltData include rapid search and recovery, and it’s a standalone app that doesn’t require root. Cons include a somewhat convoluted interface and a limited trial.
What should I look for when choosing data recovery services for Android?
Look for services with a proven track record, the ability to recover a wide range of data types, and support for data extraction from broken or non-operational devices.